


Wax seal stickers are a delightful blend of tradition and modern convenience. They offer the charm of classic wax seals without the mess. Perfect for adding a personal touch to your correspondence, they are easy to make and use.
Creating your own wax seal stickers can be a fun and rewarding project. With a few simple tools, you can craft beautiful, custom designs. Whether for wedding invitations or personal letters, these stickers add elegance and style.

Personalized wax seals can reflect your unique taste or brand. They are versatile, suitable for various occasions and projects. From formal events to casual gatherings, wax seal stickers enhance any presentation.
In this guide, you 'll learn how to make your own wax seal stickers. We 'll cover everything from essential tools to creative customization tips. Get ready to elevate your stationery game with this timeless craft.
What Are Wax Seal Stickers?
Wax seal stickers are a modern twist on the classic wax seals used for letters. Traditionally, wax seals required melted wax and a stamp. They served as both a seal and a decoration, adding an element of prestige.
With wax seal stickers, you get the same elegant appearance without the fuss. These stickers have an adhesive backing. This makes them easy to apply to any flat surface.
Here are some quick points about wax seal stickers:
- They mimic traditional wax seals.
- They are faster and cleaner to use.
- They come in various designs and colors.
Custom wax seals offer endless possibilities for personalization. Choose designs that match your style or event theme. Whether you opt for initials, symbols, or patterns, the result is always classy.
Creating personalized wax seals is also an environmentally friendly choice. These stickers can be reused or recycled, unlike disposable seals. Plus, they bring a unique touch to your invitations and gifts.
Essential Tools and Materials
Creating wax seal stickers requires a few basic tools and materials. These items are essential for beginners and experienced crafters alike. Gather them before you begin your project.
First, you need quality wax. Choose from wax sticks or beads, which come in an array of colors. This will allow you to customize your seals to match your stationery.
Equally important is the wax seal stamp. Opt for designs that reflect your personal taste or event theme. Investing in a durable stamp ensures crisp impressions every time you use it.
Here 's a checklist of the essentials:
- Wax (sticks or beads)
- Wax seal stamp
- Non-stick surface (like parchment paper)
- Wax melting tool (spoon or glue gun)
- Adhesive backing
These materials are available from various brands, including Sealloom. Known for quality, these products promise durability and a professional finish to your projects.
Choosing Your Wax and Stamp Design
Selecting the right wax color is a crucial step in making wax seal stickers. The color should complement your stationery and align with the event 's theme. Consider metallic or pearlized wax for an elegant, luxurious look.
Stamp design is equally important as it provides the unique touch to your wax seals. You can choose designs that mirror your personality or the occasion 's aesthetic. Whether you prefer initials, logos, or intricate patterns, there 's a design for every taste.
When deciding on wax and stamp designs, consider these factors:
- Color preferences (traditional or modern)
- Event theme or personal style
- Level of detail in stamp design
- Stamp size for your specific project
By thoughtfully selecting wax and stamp designs, you 'll create personalized wax seals that enhance the appeal of your invitations, letters, and gifts. These choices will ensure your wax seal stickers leave a lasting impression.
Step-by-Step Guide: Making Wax Seal Stickers
Creating wax seal stickers at home is a rewarding craft. Let 's walk through the steps so you can master this art.

Step 1: Gather Your Materials
First, collect all the necessary materials for making wax seal stickers. You 'll need:
- Sealing wax or wax sticks
- A wax seal stamp of your chosen design
- Adhesive backing (such as double-sided tape)
- A wax melting tool (like a spoon or glue gun)
- A non-stick surface for cooling the wax
Step 2: Preparing the Work Area
A clean and organized workspace ensures a smooth process. Arrange your materials within reach and protect surfaces with parchment paper or a silicone mat.
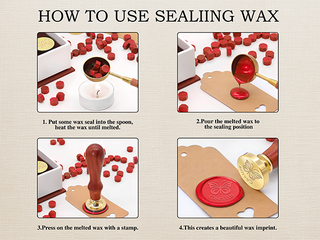
Step 3: Melting the Wax
Take the sealing wax and melt it using your tool of choice. A wax melting spoon allows for controlled pouring, while a glue gun offers continuous flow. Heat until fully melted.
Step 4: Pouring the Wax
Carefully pour the melted wax onto your non-stick surface. Form a small circle, roughly the size of your stamp. Work quickly, as the wax begins to harden soon.
Step 5: Impressing the Stamp
Before the wax hardens, press your seal stamp firmly into the center of the wax circle. Hold for a few seconds to ensure an even impression.
Step 6: Allowing the Wax to Cool
Leave the wax to cool and harden completely. Once cool, gently peel the seal from the non-stick surface.
Step 7: Adding Adhesive Backing
Attach adhesive backing to the underside of your wax seal. Trim any excess to ensure a clean, professional finish.
Step 8: Applying Your Stickers
Your wax seal stickers are ready to use. Stick them on envelopes, gift packages, or any other surfaces where you want to add a touch of class. With practice, you 'll refine your technique and craft stunning custom wax seals in no time.
Customizing & Personalizing Your Wax Seals
Wax seal stickers provide a fantastic opportunity for customization and personalization. With a few simple techniques, you can create seals that truly reflect your style.
Start by choosing a unique stamp design. It could be initials, a special logo, or an intricate pattern. Selecting a design that resonates with your personality or brand can enhance the wax seal 's impact.
Experiment with various wax colors to match different themes or occasions. Consider these customization options:
- Use metallic or pearlized wax for a luxurious look.
- Mix wax colors for a marbled effect.
- Add glitter to melted wax for sparkle.
Personalized wax seals add a distinctive touch to your projects. They can signify your brand or convey a personal message. With the right design and color, your custom wax seals can transform ordinary stationery into something memorable and unique.
Tips for Perfect Wax Seal Stickers
Creating flawless wax seal stickers takes a bit of practice and precision. However, with a few tips, you can master the craft.
Begin by ensuring your wax is at the right temperature. It should be melted, but not too runny. This consistency helps in forming a neat seal.
Consider these additional tips to enhance your technique:
- Use a non-stick surface like parchment paper to prevent sticking.
- Allow the seal to cool completely before removing it.
- Practice pressing the stamp evenly for a sharp impression.
Pay close attention to these details to improve your results. With patience and repetition, your wax seal stickers will look professional and sophisticated, perfectly accentuating any project.

Creative Uses for Wax Seal Stickers
Wax seal stickers offer versatility and charm to countless projects. Their use is not limited to stationary; their potential extends much further.
Incorporate wax seal stickers into scrapbooking, where they can hold photos and notes in place while adding a decorative flair. They offer a tactile, vintage touch to crafts.
Additionally, consider these imaginative applications:
- Decorating gift packaging with personalized seals
- Embellishing journals and planners
- Sealing favor bags for events or weddings
Their elegance makes them perfect for both formal and casual occasions. They transform simple items into extraordinary keepsakes, adding a unique and personal touch that won 't go unnoticed. The possibilities are as boundless as your creativity.
Where to Find Quality Wax Seal Supplies
Finding high-quality wax seal supplies is essential for creating impressive wax seal stickers. A good starting point is exploring reputable brands and stores known for their reliability.
Sealloom is a popular choice, celebrated for its wide range of durable and visually appealing products. Many online stores offer various options, including personalized wax seals and wax seal stamps, allowing you to create unique designs.
Consider these avenues for purchasing supplies:
- Online marketplaces like Amazon and Etsy
- Specialty craft stores
- Directly from brand websites such as Sealloom
Investing in quality materials ensures your wax seal stickers stand out and last for years to come.
Frequently Asked Questions
What are wax seal stickers?
Wax seal stickers are pre-made seals with adhesive backing, offering the classic look of wax seals without the mess.
Can I customize my wax seals?
Yes, you can create custom wax seals by selecting unique designs, initials, or logos for a personalized touch.
How do I apply wax seal stickers?
Peel off the backing and press the sticker onto your desired surface for easy application.
Are there tips for beginners?
Absolutely! Starting with practice seals helps achieve a polished finish. Remember, experimenting with various wax colors and stamp designs can add variety. This allows you to create beautiful and unique designs for any occasion.
Conclusion
Wax seal stickers add timeless elegance to any project. They effortlessly blend vintage charm with modern convenience. Whether for invitations, gifts, or personal projects, their unique touch is undeniable.
Creating these stickers provides a creative outlet and personal satisfaction. With endless customization options, you can reflect your style beautifully. Start experimenting today and see how these small details make a big impact. Elevate your correspondence and leave a lasting impression. The art of wax seals is no longer a relic of the past—it 's your next creative venture.