


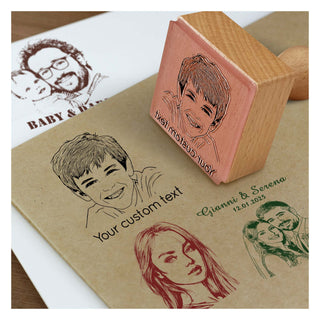

Making a rubber stamp from a photo is both fun and meaningful. However, since photos cannot be engraved on stamps in full color, it is very important to preview the pattern effect before proceeding with the actual engraving. Below are some commonly used preview methods:
1. Convert the Photo to a Black-and-White High-Contrast Image
Rubber stamps primarily rely on black-and-white images to engrave patterns. You can use the following tools to convert your photo:
- Photoshop: Use the “Threshold” or “Tone Separation” function;
- GIMP (free software): Use “Desaturate” and “Levels”;
- Online tools: Try searching keywords like “photo to stamp effect” or “image to black and white sketch.”
We especially recommend the website: https://cutecutter.com.
These tools will help you visualize how a photo might appear once simplified into a black-and-white line drawing.
2. Use Filters to Simulate Stamp Styles

Many online platforms and image editing software offer filters that simulate “stamp styles” or “sketch effects”:
- Canva
- Fotor
- Photopea
- Lunapic
You can try filter keywords such as:
- Stamp effect
- Sketch
- Engraving
- Line Art
If you would like to customize a photo-based rubber stamp at Sealloom, you are welcome to contact us. You can send your photo to our designers, and we will help create a simulated preview effect for you.